Deep Dream with Tensorflow
Written by Richard

Deep Dream was originally known as Inceptionism was created by Google's Alexander Mordvintsev. There are a number of code bases on Github for Deep Dream. A Jupyter Notebook project that complements the Google AI Blog: Inceptionism can be found there.
Deep Dream takes images and processes them through a convolutional neural network like one would normally use for object detection. Normally in a CNN, the image to identify is applied to the input layer and hopefully on the output we get to know what was detected. With Deep Dream some layer's output is applied to the input layer in a kind of feedback loop, telling the network to enhance that layer. The lower neurons of the network deal with small differences like edges, corners and textures, while the higher neurons deal with higher level abstractions like cars and buildings. Maximizing and feeding back the low level neurons tend to add small details and textures. Doing the same for the high level neurons tend to add larger structures the network was trained on.
Most implementations have been trained on the ImageNet dataset. You are likely to see many dogs and cats in the generated images because the trained dataset contains many dog and cat images.
There are a number of web and mobile app based implementations of Deep Dream. If you want to experiment with the parameters and see what you can dream up, a good choice would be to use deep dream tensorflow on Github. With it being implemented using Tensorflow, it does not require a GPU to run.
The installation is easy and is easy to use. Although it does not allow parameter changes in the command line, you can implement that easily if you wish or just change some of the parameters in the code.
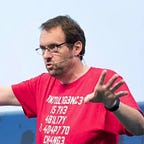
I first used my own face using all the default values.

You can see that much of the image is covered with similar squiggly lines and in a few places things that look like eyes or maybe animal faces. Particularly around my eyes it looks to me a lot like monkey faces.
The default value for the octave parameter defaults to 4 so I changed it to 8 just to see what it would do.

Here you can see that there are many more animal faces, I guess more dogs and cats. There also seems to be more deformation in that at least to me the features around my eyes and nose looks more like that of a dog. You can also see that the relatively bland background now starts to contain more structure. So increasing octaves actively enhances the effect. Doubling octave essentially increases the number of iterations of applying enhancements thus also doubling the time it took to generate the image.
Doubling the octave scale had a similar effect as doubling the octave. The time to generate remained about the same as the original settings but induced more dream effect.

I also tried changing the tile size from 512 to 1024 but that resulted in only a slight change from the original setting was noticeable.
Next I tried the default values on some real art. I really enjoy Salvador Dali so I tried Galatea of the Spheres. The original is shown so you can compare the two.


I also enjoy M. C. Escher so I tried one of my favorites of his, Waterfall. This is a much smaller image than is my face and Dali's art images. You can't see it in the left image but it has a white border on the left and right. You will be able to see the border in the Deep Dream generated image.


The important thing to note is that the smaller the image, the greater the visible effect of seeing some animal or object images. This is because the training images themselves are quite small. I find the Waterfall Deep Dream interesting in that not only are fuller images of animals seen but it appears that the waterwheel has been copied to many portions of the image.
Up until the Waterfall, the images were rather large so I reduced the images to be no larger than a width of 480 pixels and tried setting different layers


You can see that the lower layers of mixed3 we have smaller detail affects and that the appearance of what might be eyes happens in these lower levels. In the next layer of mixed4 you can see more larger details appearing.

You can set the layer to any of the layers defined in the model/layername.txt file. For example mixed4c_pool_reduce produced the above image which to me looks more feather-like. Not all layers produce something pleasing. Play around with it and see what weird and wonderful images you can make.